Gimp Tutorial : Tools, Download and More!

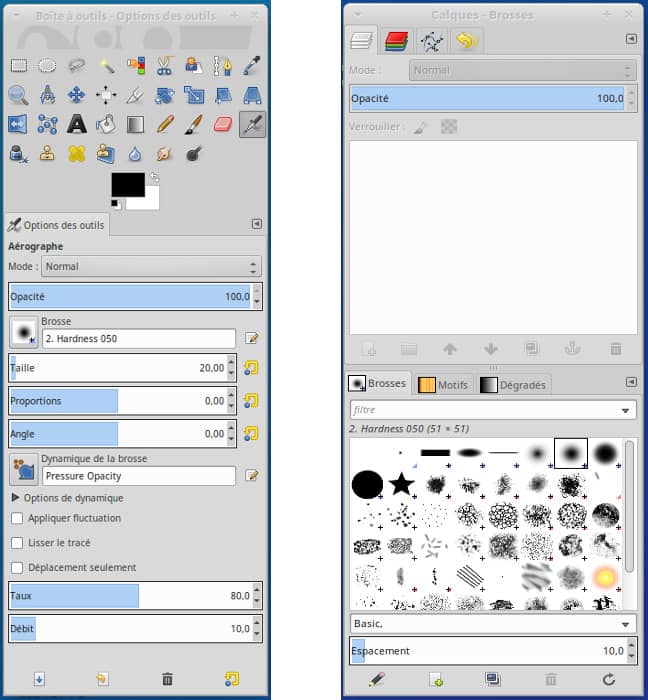
There are many different tools available in the GIMP toolbox. This article will go over the various selection tools available in the toolbox, as well as transformation and cloning tools. Once you understand how they work, you'll be ready to use them to enhance your images. But first, let's review the basics of the GIMP toolbox. This section will also cover the different menu items available in the toolbox.
What is GIMP or GIMP toolbox?
The GIMP Toolbox is a powerful and comprehensive set of tools for working on your images. The tool icons appear when you hover the cursor over them and indicate the action they perform. Most tools have several options; the toolbox is divided into three or four functional areas. When you open a tool, you can activate it by clicking on it or selecting it with a keyboard shortcut. Here is an overview of each tool's options.
GIMP has many different selection tools. Try using them all. The more tools you know, the more likely you are to achieve better results. You can also add your own tools to the toolbox by navigating to the Tools menu. Just remember that you can customize the toolbox in GIMP, as long as it is accessible. And, if you are unfamiliar with GIMP, check out some of the other tools it has.
What is GIMP used for?
GIMP (GNU Image Manipulation Program) is a free and open-source image and graphics editing software. It is used for:
- Photo editing: It allows retouching and adjusting digital photos.
- Graphics creation: It is used to design graphics from scratch, like logos, icons, banners, etc.
- Image manipulation: It is used to creatively change an image, such as adding elements or changing colors.
- File format conversion: It can open and save many types of image files, making it useful for format conversion.
- Animation: With GIMP, animated images can be created.
5 Advantages of GIMP
- Accessibility: GIMP is free and open-source, making it available to everyone at no cost.
- Compatibility: It works with all major operating systems, including Linux, macOS, and Windows.
- Powerful Tools: Offers a wide range of tools for photo editing and graphics creation.
- Customization: Allows users to customize the interface and add plugins to increase functionality.
- Format Support: Supports a variety of file formats, including professional ones, and allows conversion between them.
GIMP Tools: Know and Master Them!
In this section, you will learn how to use each of the tools in the GIMP toolbox, a free and open-source image editing software. The sections will be dedicated to the different tools or groupings of similar tools. Make sure to read each part carefully to understand each utility to the fullest.
I. GIMP Selection Tools
1. Rectangular Select Tool (R)
This tool allows you to select a rectangular or square area in your image.
How to use it:
- Select the tool from the toolbox or press the R key.
- Click and drag the mouse over the area you want to select.
- Release the mouse button to complete the selection.
Keyboard shortcut: R
2. Ellipse Select Tool (E)
The elliptical select tool allows you to select areas in a circle or ellipse shape.
How to use it:
- Activate the tool in the toolbox or use the E shortcut.
- Click and drag the mouse over the area to be selected.
- Release the mouse button when finished.
Keyboard shortcut: E
3. Free Select Tool (F)
This tool allows you to select areas of any shape by drawing the selection freehand.
How to use it:
- Select the tool from the box or press F.
- Click and drag the mouse around the area to be selected.
- Release the button to complete the selection.
Keyboard shortcut: F
| Tool | Keyboard Shortcut |
|---|---|
| Rectangular Select Tool | R |
| Ellipse Select Tool | AND |
| Free Select Tool | F |
II. Paint Tools
1. Pencil Tool (N)
The pencil is a basic painting tool that allows you to draw freehand on your image.
How to use it:
- Select the tool in the box or press the N key.
- Click and drag the mouse to start drawing.
- Release the button to stop drawing.
Keyboard shortcut: N
2. Brush Tool (P)
The brush is similar to the pencil, but offers more customization options, such as changing the size, opacity, and borders of the stroke.
How to use it:
- Select the tool in the box or press the P key.
- Click and drag the mouse to paint.
- Release the button to stop painting.
Keyboard shortcut: P
3. Airbrush Tool (A)
The airbrush is a smooth painting tool that applies color more dispersedly, creating a spray effect.
How to use it:
- Select the tool in the box or press the A key.
- Click and drag the mouse to start painting.
- Release the button to stop painting.
Keyboard shortcut: A
| Tool | Keyboard shortcut |
|---|---|
| pencil tool | N |
| Brush Tool | P |
| airbrush tool | A |
III. Transformation Tools
1. Move Tool (M)
The move tool allows you to move layers, selections, or other elements in your image.
How to use it:
- Select the tool in the box or press the M key.
- Click on the element you want to move and drag.
- Release the button to stop the movement.
Keyboard shortcut: M
2. Scale Tool (Shift + S)
With the scale tool you can change the size of layers, selections and other elements.
How to use it:
- Select the tool in the box or press Shift + S.
- Click on the item to be scaled and drag to resize.
- Release the button and press Enter to confirm.
Keyboard shortcut: Shift + S
3. Rotate Tool (Shift + R)
The rotate tool allows you to rotate layers, selections, and other items.
How to use it:
- Select the tool in the box or press Shift + R.
- Click on the element to rotate and drag to change the orientation.
- Release the button and press Enter to confirm.
Keyboard shortcut: Shift + R
| Tool | Keyboard shortcut |
|---|---|
| move tool | M |
| Scale Tool | Shift + S |
| rotate tool | Shift + R |
IV. Fill Tools
1. Cube Fill Tool (Shift + B)
The Bucket Fill Tool allows you to fill an area of similar color or an entire selection with a solid color or pattern.
How to use it:
- Select the tool in the box or press Shift + B.
- Select a fill color from the palette.
- Click on the area you want to fill.
Keyboard shortcut: Shift + B
2. Gradient Tool (L)
How to use it:
- Select the tool in the box or press the L key.
- Choose your desired gradient in the tool settings.
- Click and drag in the area where you want to apply the gradient.
- Release the mouse button to apply the gradient.
Keyboard shortcut: L
| Tool | Keyboard shortcut |
|---|---|
| Cube Fill Tool | Shift + B |
| Gradient Tool | L |
V. Text and Drawing Tools
1. Text Tool (T)
The text tool allows you to add text to your image.
How to use it:
- Select the tool in the box or press the T key.
- Click where you want to start typing text.
- Write your text and use the tool options to adjust the font, size, color, etc.
Keyboard shortcut: T
2. Stroke Tool (Shift + B)
The trace tool allows you to create complex shapes and lines.
How to use it:
- Select the tool in the box or press Shift + B.
- Click to define the points of the stroke on your image.
- Click on the first point to close the path if you want to create a closed shape.
- Use the tool options to adjust the stroke.
Keyboard shortcut: Shift + B
| Tool | Keyboard shortcut |
|---|---|
| Text Tool | T |
| trace tool | Shift + B |
SAW. Measurement and Navigation Tools
1. Measure Tool (Shift + M)
This tool allows you to measure distances and angles in your image.
How to use it:
- Select the tool in the box or press Shift + M.
- Click and drag to measure a distance.
- Observe the measured distance in the status bar at the bottom of the window.
Keyboard shortcut: Shift + M
2. Zoom Tool (Z)
Zoom allows you to zoom in or out of your image.
How to use it:
- Select the tool in the box or press the Z key.
- Click on the image to zoom in.
- To zoom out, hold down the Ctrl key while clicking.
Keyboard shortcut: Z
3. Move Tool (M)
This tool allows you to pan around your image when you're at a zoom level where you can't see the entire image at once.
How to use it:
- Select the tool in the box or press the M key.
- Click and drag on the image to move.
Keyboard shortcut: M
| Tool | Keyboard shortcut |
|---|---|
| Measurement Tool | Shift + M |
| Zoom Tool | WITH |
| move tool | M |
VII. Color Manipulation Tools
1. Foreground and Background Color Tool (D)
This tool allows you to select the foreground and background colors to use when painting, filling, etc.
How to use it:
- Select the tool in the box or press the D key.
- Click the foreground or background color square to open the color picker.
- Select your color and click OK.
Keyboard shortcut: D
2. Color Swap Tool (X)
This tool allows you to quickly swap your foreground and background colors.
How to use it:
- Just hit the X key to swap the foreground and background colors.
Keyboard shortcut: X
| Tool | Keyboard shortcut |
|---|---|
| Foreground and Background Color Tool | D |
| Color Swap Tool | X |
Download Gimp

You can download it from the ptodown website , which is very safe, hundreds of applications for various operating systems. Here is the link:
This concludes our detailed tutorial on GIMP tools. By familiarizing yourself with these tools and their functions, you will be able to take full advantage of GIMP's potential and create high-quality image editing work. Remember that practice makes perfect, so feel free to experiment and practice with these tools!
See also:
